The Color Picker
As we have seen in the paragraphs above, the color picker is accessible when you have an object selected, by clicking on the little color rectangle next to any fill, border or shadow.
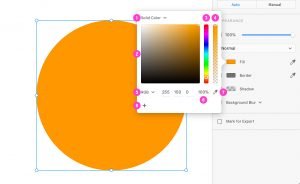
Here are the few areas of the color picker we need to pay attention to:
(1) Switch between Solid Color and Gradient. We’ll see gradients in the next chapter, in this chapter we’ll deal with Solid Colors.
(2) The larger square is where you actually select the color you want
(3) The first colorfoul vertical stripe allows you to quickly navigate through different colors
(4) The second vertical stripe controls the color opacity. Drag the handle to the bottom to lower the opacity. The change will also be reflected in the “A” (alpha) value just below it.
(5) Select the color mode that you want to be displayed between: HEX, RGB and HSV.
(6) Set the opacity (Alpha) of the color.
(7) Click the Eyedropper tool to select a color from the artboard.
(8) When you click on the “+” icon, the color currently selected will be added as a favourite color (swatch) at the bottom of the popup. All your swatches will be lined up here and will be available every time you open the color picker, for any artboard within the same .xd document. It’s a super useful way of having all the colors you need in one place. You can remove a swatch by clicking on it and dragging it out of the color picker popup.