Exporting assets
Unless the front-end developers who are going to code your designs are independent enough to retrieve the design assets directly from your XD file, chances are you will be the one having to export all the assets for them.
By assets, I mean those design files that will be needed by the developers to re-create what you designed, using HTML/CSS/JS in case of a website, or native languages like Swift or Java in case of iOS and Android apps.
In general, the most common assets are bitmap images, icons and background patterns.
You might also need to simply export some of your artboards in order to present your work to your clients or coworkers.
At the moment, in Adobe XD you can export design assets as PNG, PDF, SVG and JPG formats.
To export one or more assets:
1. Select one or multiple objects directly from your artboards or from the layers panel.
2. Select File > Export, or use the shortcut CMD + E (Mac) & CTRL + E (Win)
3. Select the format you need (PNG, PDF, SVG or JPG). There are different export options for each of these formats.
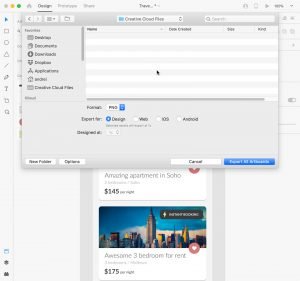
Export as PNG
When exporting assets as PNG, first of all you have to choose which platform you want them to be exported for:
• Design: The default option where your asset is exported at 1x resolution. Choose this if for example you just want to export one of your artboards.
• Web: Assets are exported at 1x and 2x resolutions.
• iOS: Assets are exported at 1x, 2x, and 3x resolutions.
• Android: Assets are optimised and exported for all the currently available Android screen densities: ldpi, mdpi, hdpi, xhdpi, xxhdpi, xxxhdpi
After choosing the target platform, you need to select the resolution at which you created your designs, from the “Designed at” dropdown menu.
Chances are you designed at 1x (if you used the default artboard sizes provided by XD). Some designers prefer to design at higher resolutions, like 2x or even 3x.
Example: if I design an iPhone7 screen at 2x, my artboard size will be 750×1334 px, which is twice the size of the standard 1x artboard 375×667.
In this case, when I export assets, I will have to select “2x” from the “Designed at” dropdown menu.
As a last step, select the destination folder and click on the Export button.
Export as SVG
This format is widely used for icons or other vector assets which need to scale on different screen sizes without losing quality, for example in responsive websites.
When exporting as SVG, you have two options to choose from:
- Embed: the bitmap image you are saving is placed into the SVG file itself.
- Link: the bitmap image you are saving is stored separately, and a reference to it is added in the SVG file.
In doubt, just choose the Embed option.
You can also tick the “Optimize asset” checkbox if you want lighter assets in terms of file sizes (the code within the SVG file will be minified, resulting in smaller file).
Export as PDF
PDF is not a format used when coding web or mobile apps or websites, but it might come in handy if you need to share your designs with clients, stakeholders or coworkers.
Select the artboards or objects you want to export and choose if you want to export them as a Single PDF file (all artboards will be included in the same PDF file) or as Multiple PDF files (each artboard will be saved as an individual PDF file).
Quick export (copy and paste)
If you need to quickly show your work without having to save a file on your machine, you can quickly do that by selecting your artboard or object, copying it and then pasting it into a chat window (Slack, Skype, Whatsapp Desktop ..) or an email.
This is really useful when you need a quick feedback from clients or coworkers.